Categories
Practical Violin Video Exercises and Tips Violin Vibrato

Violin Vibrato, a Canary in the Orchestra Pit


I’m watching your playing. Maybe at a gig, in orchestra and of course during your violin lesson. It’s like x-ray vision, though not in a creepy sort of way. Call it an occupational hazard of being a long time violin teacher.

I don’t have to hear you play. A very few visual cues will tell me whether you approach the violin with ease and mastery. Or if you are engaging in battles (or just skirmishes) with your instrument.

Perhaps the biggest canary in my coal mine is your left hand, and how you use it to produce vibrato. Because a great violin vibrato is the natural result of good basic playing habits.

For my fellow vibrato nerds:

There are only a very few simple motions needed to produce vibrato, I describe them in obsessive detail in this video.

Categories
Getting Started on Violin Video Exercises and Tips

Violin Cheat Sheet for the Left Hand

For young students just beginning violin, there’s much to cover. Bowing problems can usually be fixed, but I find that it’s the left (violin) hand, that can make or break a violin journey. This short video covers the basics. You can download a hard copy by using the free instant download link at right.

Categories
Practical Violin Practicing the Violin Video Exercises and Tips Violin Lessons for Kids

Why Looks *Do* Matter for Violinists

My X-Ray Vision for How Well You Play the Violin

Send me a still photo of your kid with her violin in playing position. It won’t take me more than 10 seconds to determine if she’ll be able to make any progress beyond her first year of playing. It’s not that I’m some brilliant pedagog of string playing. But after a decade of teaching young students the violin it’s quite clear when an approach is doomed to failure.

Here it is in plain English: if your posture is poor, so is your tone and technique. Stated another way, you must look something like a pro, if you want to advance past beginner. Mind you, looks are not a guarantee of progress, but they most certainly are a condition of success.

The Sink or Swim Factor for Violin Beginners

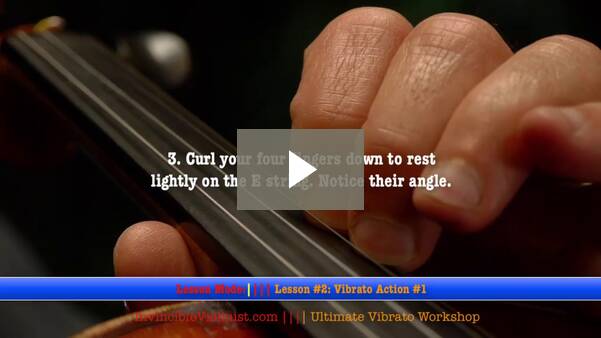
The number one success factor for new violinists rests in the left (or violin) hand. Fingers must be curved and inclined, just so. The perfect amount of pressure must be applied to the fingerboard. Too much squeeze and the tension will kill you, not enough and the tone will suffer. Because all of this is so crucial, I’ve devised routines to help students learn it in baby steps. This is an example of such a routine.

Over the years, I’ve developed many such routines. If you’d to see them, sign up for my e-course. Totally free, the form is at the bottom of this post.

Beyond the Violin Hand

But wait, there’s more! Like how exactly do you position the violin on your shoulder? And how do the arm, elbow and shoulder come into play? Yeah, it all matters, more than you might expect. And we haven’t even discussed the bow yet!

Patience is Your Friend

Don’t get me wrong, I admire your zeal to move ahead quickly and learn your favorite songs. Though really, learning songs is only the tip of the iceberg. More often than not, what the violin can teach you and your children is the virtue of patience.

Practical Advice for Invincible Violinists: Take your time, especially at the beginning. Don’t worry so much about learning songs; the extra time you spend with your kids on the basics will more than make up for itself with rapid progress in the future.

Focus on producing a full tone with a minimum of effort. Be certain that you have a comfortable and cozy physical relationship with your instrument. And don’t forget to look in the mirror. If it doesn’t look right, it probably isn’t.

YGTF8WFHCGCQ

Categories
Getting Started on Violin Video Exercises and Tips Violin Lessons for Kids

Violin: Do You Find it “Touching?”

Grasping

Flop that fiddle on your shoulder and put your fingers on the fingerboard. Ready to go, yes? Well, actually… no!

Right out of the cradle we’re pre-programmed to play the violin wrong. Our very first instinct actually works against us.

Hand a baby a rattle, and she grasps it. Hand a five year old a violin, and she does pretty much the same thing with her left (violin) hand. That grasping motion works great; it’s extremely powerful.

The only problem is that this type of power actually works against the violinist. What a violinist really needs is exactly the opposite thing, a delicate touch, freedom of movement and a high degree of finesse.

In the violin studio, even the teacher’s simple choice of a word can influence success or failure. I work hard to remove words such as “bow grip” from my vocabulary. Similarly we need to find the right word to describe how the violin hand approaches the instrument.

Hand Position in Violin Image
Touch Typing

I like the word “touch” as in touch typing. The touch typist on a modern keyboard uses a light, fast motion. His fingers are curved and his knuckles are high. Playing the violin well is amazingly much the same.

Playing the violin is much the same as typing an e-mail to a friend on your PCs keyboard.

The First Time Ever You Touch a Violin

Do this right the first time, and you’re off to a great start. Do it wrong, and you’ve got a bad habit. Minutes or seconds can establish the habit. It could take months to re-learn it the correct way.

Because a picture (or in this case a video) is worth one thousand words, I’m creating a video demonstration to help you get started. As always, this can work best under the supervision of a qualified teacher. So I’m not going to say “don’t try this at home” but then again, self-taught violinists are a rare breed indeed.

If you find any part of this unclear, please let me know. It’s my endeavor to make this the best it can be!


If you find this information helpful, please share or tweet this page or post, using the buttons below. Thanks!

Categories
Getting Started on Violin Video Exercises and Tips Violin Lessons for Kids

The “Guitarra” exercise

Except from: Master Sequence for young beginner students.

1. Violin “setup” correctly and comfortable on the collar bone. This will be more fully described in the InvicibleViolinist.com Master Sequence.

2. Learn to properly position the left “violin” hand around the neck and fingerboard.

This is probably the source of more “screw ups” than any other element of early violin technique. If  you focus on mastering the left hand early in the game, everything that follows is relatively simple.

I created this exercise because this hand-violin relationship is much easier to learn when broken down in steps. When (and only when) your student can perform this simple movement in good form, do you move to the next step.

This “umbrella” of fingers over the fingerboard and hand astride the neck is simple to perform with the violin in a guitar like position. Note the elevated angle of the scroll.

3. Finally, move the violin with (hand and arm already in perfect position) into playing position. Once in position, our Master Sequence Practice Angel will test for correct posture and freedom of movement.

If you find this information helpful, please share or tweet this page or post, using the buttons below. Thanks!