Categories
Getting Started on Violin Practical Violin

Is your Violin Chin Rest a Good Fit?

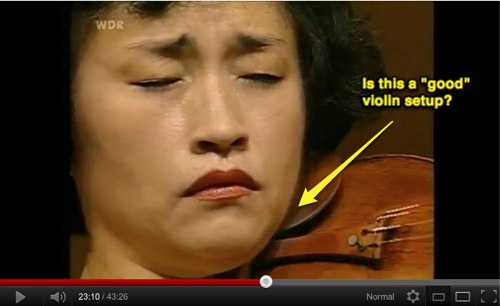
Analyzing Violin Chin Rest Setup - Artist Kyung-Wha-Chung

First of all, enjoy this video of Kyung-Wha-Chung, one of the great violin artists of our time. It’s a fabulous, world class and heartfelt performance by any standard.

Viewed from the perspective of a violin teacher, I feel obligated to point out that from a setup standpoint, the violin and the violinist may not be set up to best advantage, though I would be the last to suggest that Ms. Chung change anything about her playing.

On the other hand, when I see a fit or setup problem in a young student, I would always try to make things more comfortable and practical.

In this case notice that the player’s jaw bone isn’t aligned in the “groove” of the chin rest. Often in a case such as this, a chin rest that floats over the tailpiece of the violin might be more comfortable for the player. It won’t work for everyone as factors such as length of neck and arms also come into play. All of this can (and should) be analyzed by someone experienced in optimizing the violin/chin rest/shoulder rest combination.

So why does this work so well for Ms. Chung? Simply because her approach to the violin is dynamic, not rigid. The instrument isn’t locked into place. Rather, it floats, moves and adjusts along with the needs of the musical passage. The weight of the violin is balanced between multiple points, keeping the head and neck free of excess tension. It’s a great lesson for every player.

Why make things difficult when they can be simple?

For our younger Invincible Violinists and their families, know this: Never accept your instrument setup at face value. The size, lift and type of chin rest, the presence (or absence of) a shoulder rest, the way your instrument relates to your body and its movements, all of this, shouldn’t be left to chance.

If you find this information helpful, please share or tweet this page or post, using the buttons below. Thanks!
Categories
Practical Violin

Violin String Broke! Now What?


“OH NO!  While tuning the violin I snapped a string. Can I fix it? Or does it go back to the violin shop?”

No need to panic. We can fix this!  Click here to replace your snapped violin string.

Here are seven things you can do to prevent breaking strings prematurely and to minimize inconvenience when breaks occur:

1. As a violin parent, learn to tune the violin properly. The easiest way to break a string, especially an E string, is to tune it too high. Don’t ask your 5 year old student to perform this operation!

2. Before installing new strings, lubricate the 2 contact points at the bridge and nut of the violin with a small amount of pencil lead.

3. Be sure that your instrument has quality tuning pegs that operate smoothly. Pegs that slip make you tune the strings more frequently, adding stress and reducing their life.

4. When tuning, gradually raise the pitch of the string to the required note, but not more than a small amount above. On student violins, use the fine tuners to make small adjustments, in lieu of the tuning pegs, which can be more difficult to operate.

5. Use an electronic tuner when learning how to tune. Tuning by ear is risky, if you’re not trained in that approach.

6. Practice often, and tune at least once at the beginning of every practice session. A neglected violin is more likely to lose its tuning by a large amount.

7. Purchase quality strings that are correctly sized for your instrument. Keep a spare set in your case, and perhaps more than one spare on the E string.

Click here to visit my violin string website for complete instructions on how to replace your snapped violin strings.

Categories
Getting Started on Violin Video Exercises and Tips Violin Lessons for Kids

The “Guitarra” exercise

Except from: Master Sequence for young beginner students.

1. Violin “setup” correctly and comfortable on the collar bone. This will be more fully described in the InvicibleViolinist.com Master Sequence.

2. Learn to properly position the left “violin” hand around the neck and fingerboard.

This is probably the source of more “screw ups” than any other element of early violin technique. If  you focus on mastering the left hand early in the game, everything that follows is relatively simple.

I created this exercise because this hand-violin relationship is much easier to learn when broken down in steps. When (and only when) your student can perform this simple movement in good form, do you move to the next step.

This “umbrella” of fingers over the fingerboard and hand astride the neck is simple to perform with the violin in a guitar like position. Note the elevated angle of the scroll.

3. Finally, move the violin with (hand and arm already in perfect position) into playing position. Once in position, our Master Sequence Practice Angel will test for correct posture and freedom of movement.

If you find this information helpful, please share or tweet this page or post, using the buttons below. Thanks!
Categories
Getting Started on Violin Practicing the Violin Suzuki Violin

How much money are you wasting on violin lessons?

It’s a fair question.

When I was a young student, I wasted my share of family funds in the violin studio. I was unprepared. I didn’t fully understand what the teacher was saying. The subject matter was over my head. The teacher couldn’t explain it in a way I could understand. It could be 1000 things. And over the years, it probably *was* 1000 things..

And it’s not all on the student side; teachers are human… they make mistakes too. They miss things that should be fixed. Or they don’t know how to correct problems that the students brings into the studio.

Enter the real world; distracted parent, exhausted student and frustrated teacher. This is not a recipe for making progress on the violin.

It gets me when people worry about the high cost of private lessons, then turn around and barely put any effort into making good use of the invested time and money. It just doesn’t make any kind of sense.

That’s why Invincible Violinists are always fully prepared. They value their time and money. They want to use their teacher’s expertise in the best possible way. Whether in the studio or at home, they’re embracing the best practices.

The most expensive violin lessons you can ever take, are the ones you have to take over. And over, and over.

If you find this information helpful, please share or tweet this page or post, using the buttons below. Thanks!
Categories
Violin for Fun

What is my violin worth?

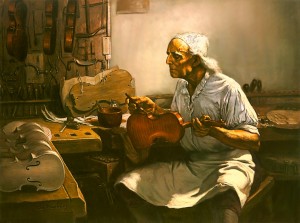
STRADIVARI portrait by Alton s. Tobey, 1971
The king of all violin makers, Antonio Stradavarius in a portrait by Alton Tobey


Is your violin a Strad?


Could that violin you’ve been storing in the closet be a Strad worth millions?

There are literally millions of violins in existence that bear the label Antonius Stradivarius; they’re almost all copies of the classic “Strad” model made famous by the master from Cremona, Italy. Antonio Stradivari handcrafted about 700 instruments during his lifetime. All but 100 are accounted for.

Even though your instrument may not be a real Strad, it still may have considerable value. Strad copies range from junk level factory made instruments to very fine handmade violins worth thousands of dollars. The maker, construction and condition of your instrument all go into determining its value.

The best way to determine the value of a violin is to get an appraisal from a violin shop (luthier.) He or she will be able to determine the authenticity of your instrument, the cost of needed repairs and an approximate market value. A more formal written appraisal might be warranted if you own a fine instrument. You should expect to pay a fee for such an appraisal.

The greatest value your violin might hold is the joy it can bring you when you play it. Fix it up; get some lessons and make some music!

If you find this information helpful, please share or tweet this page or post, using the buttons below. Thanks!